≡ Menu

width="535"

Lots of birds, and lots of cover for them.

Alan and I met the bird watcher in the parking lot of the Big Morongo Canyon Preserve a few miles north of Palm Springs. He was sitting on the tailgate of his car, a thin gray man in full birding gear: Tilley hat, multi-pocket vest, high-powered binoculars. He looked tired, and not very friendly.

We said hello, and asked if he’d seen any birds.
“Just house finches,” he said. “I get them at my feeder in South Carolina.”

We wished him luck and set off to hike the preserve. At its heart lies a small wetland, a lush green valley at the base of dry desert hills.

width="300"

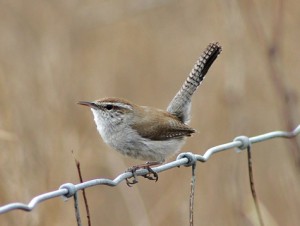
Bewick's Wren, at attention, as ever.

As we walked on the boardwalk in the bushy part of the preserve, we encountered two Bewick’s Wrens, facing each other from separate bushes, tails as upright as small territorial flags: much chatter, a chase, and then they disappeared.

Where the trail moved out into the dry hills, flocks of White-Crowned Sparrows, cousins of the ones who spend their summers in the parking lot across the street from Yoga on 7th, foraged on ground that looked as barren as asphalt.

Then we saw something we couldn’t identify: a glossy bird perched on the top branch of a low-growing tree. It could have been some kind of blackbird, except for the crest and the red eyes.

We rejoined the marsh trail, with its even boardwalk, and there, on a bench, sat the South Carolina bird watcher. I asked him what birds he’d seen.

“Just some Bewick’s Wrens,” he said. “The birds have a lot of cover in here.”

I mentioned a small yellow bird we’d glimpsed a short way down the path, but didn’t get a good look at, since it was wisely taking advantage of the cover. Then I walked on, wondering how it was possible not to be glad under a blue dome of a sky, in a lush oasis filled with bird song. Isn’t a Bewick’s Wren miracle enough?

"width=

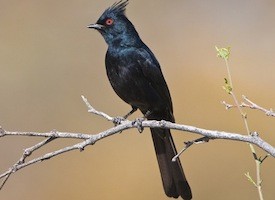
Phainopeplas eat more than 1,100 mistletoe berries a day, each, when they're in season.

Back at our temporary home, I scoured the bird book, while a male house finch with a flaming red breast – we get them at our feeder too – sang from the highest spike of the nearby Ocotillo cactus. I couldn’t find the shiny black crested bird. Nothing even came close.

Hours later, I picked up the book again. Flipping idly through the rare birds section in the back pages, I found it. We’d seen a Phainopepla (pronounced fay-no-PEP-la), a silky flycatcher. The name is Greek for “shiny robe.”

I was ecstatic, not least because Phainopepla is fun to say, and I can make Alan laugh now, almost any time, by gazing at him intently and saying: “Phainopepla.” I don’t keep a life list – a list of all the birds a birder has seen – but if I did, I’d have been very happy to add my first silky flycatcher.

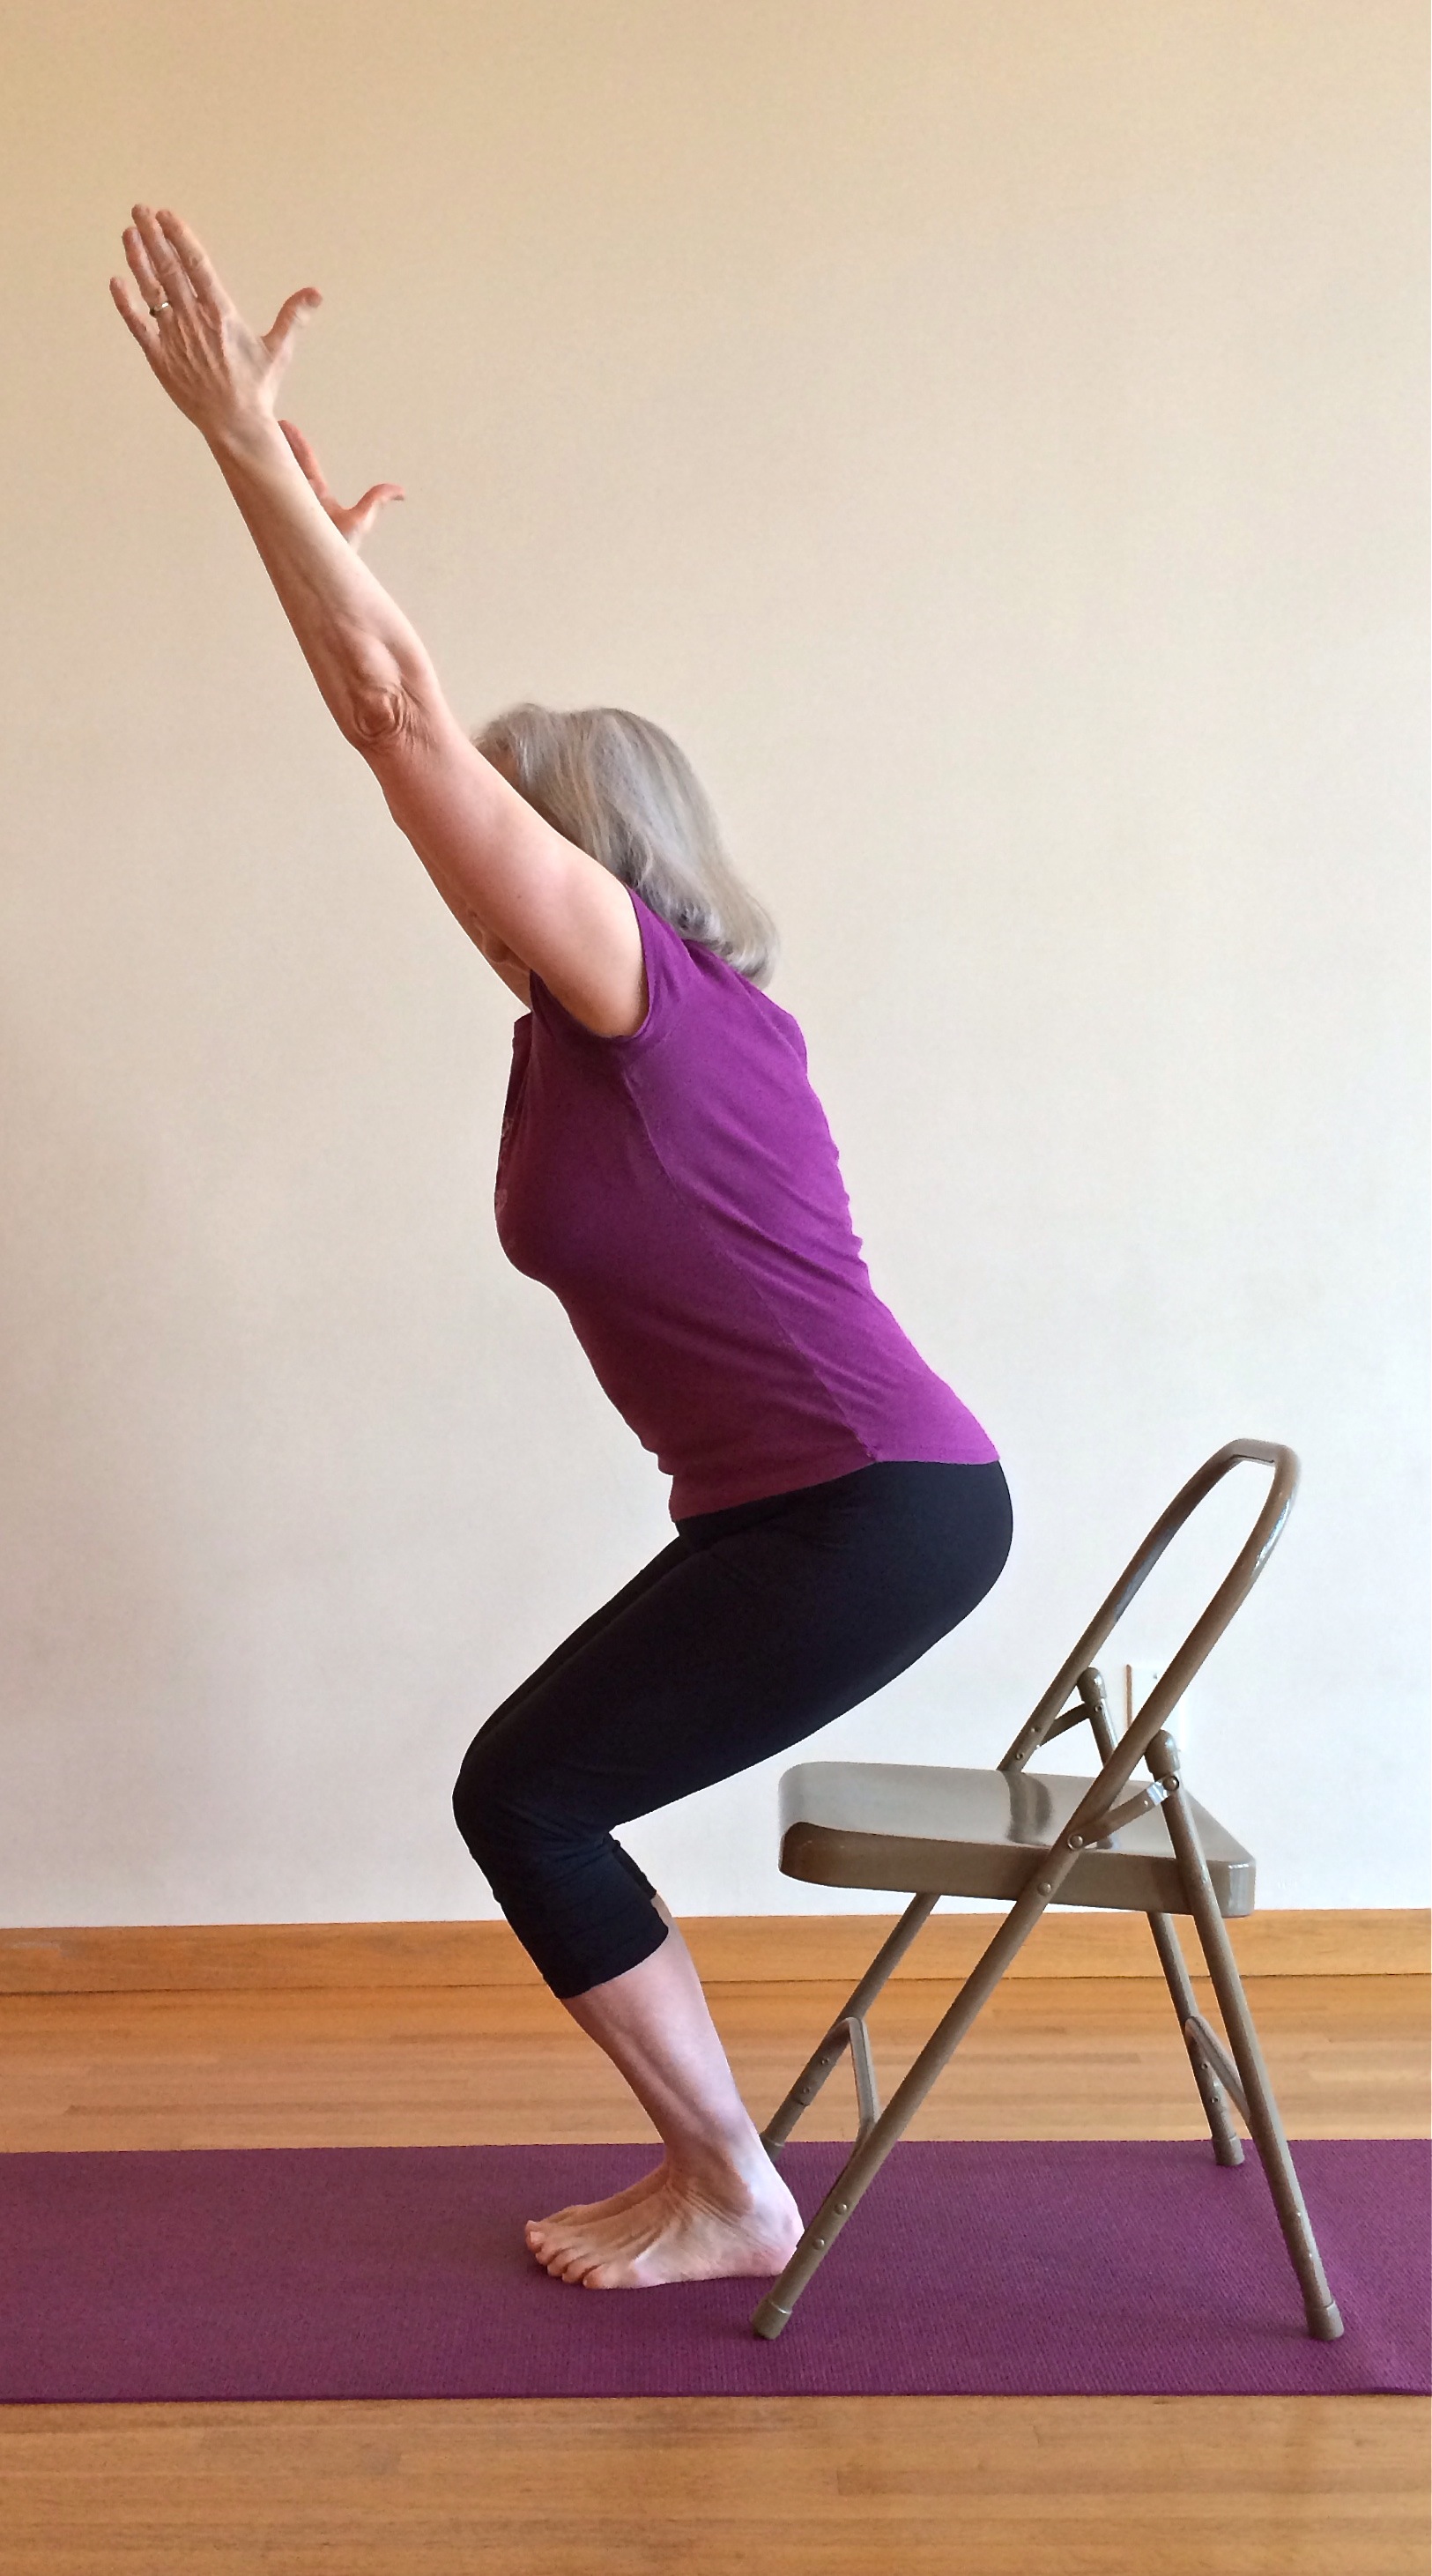
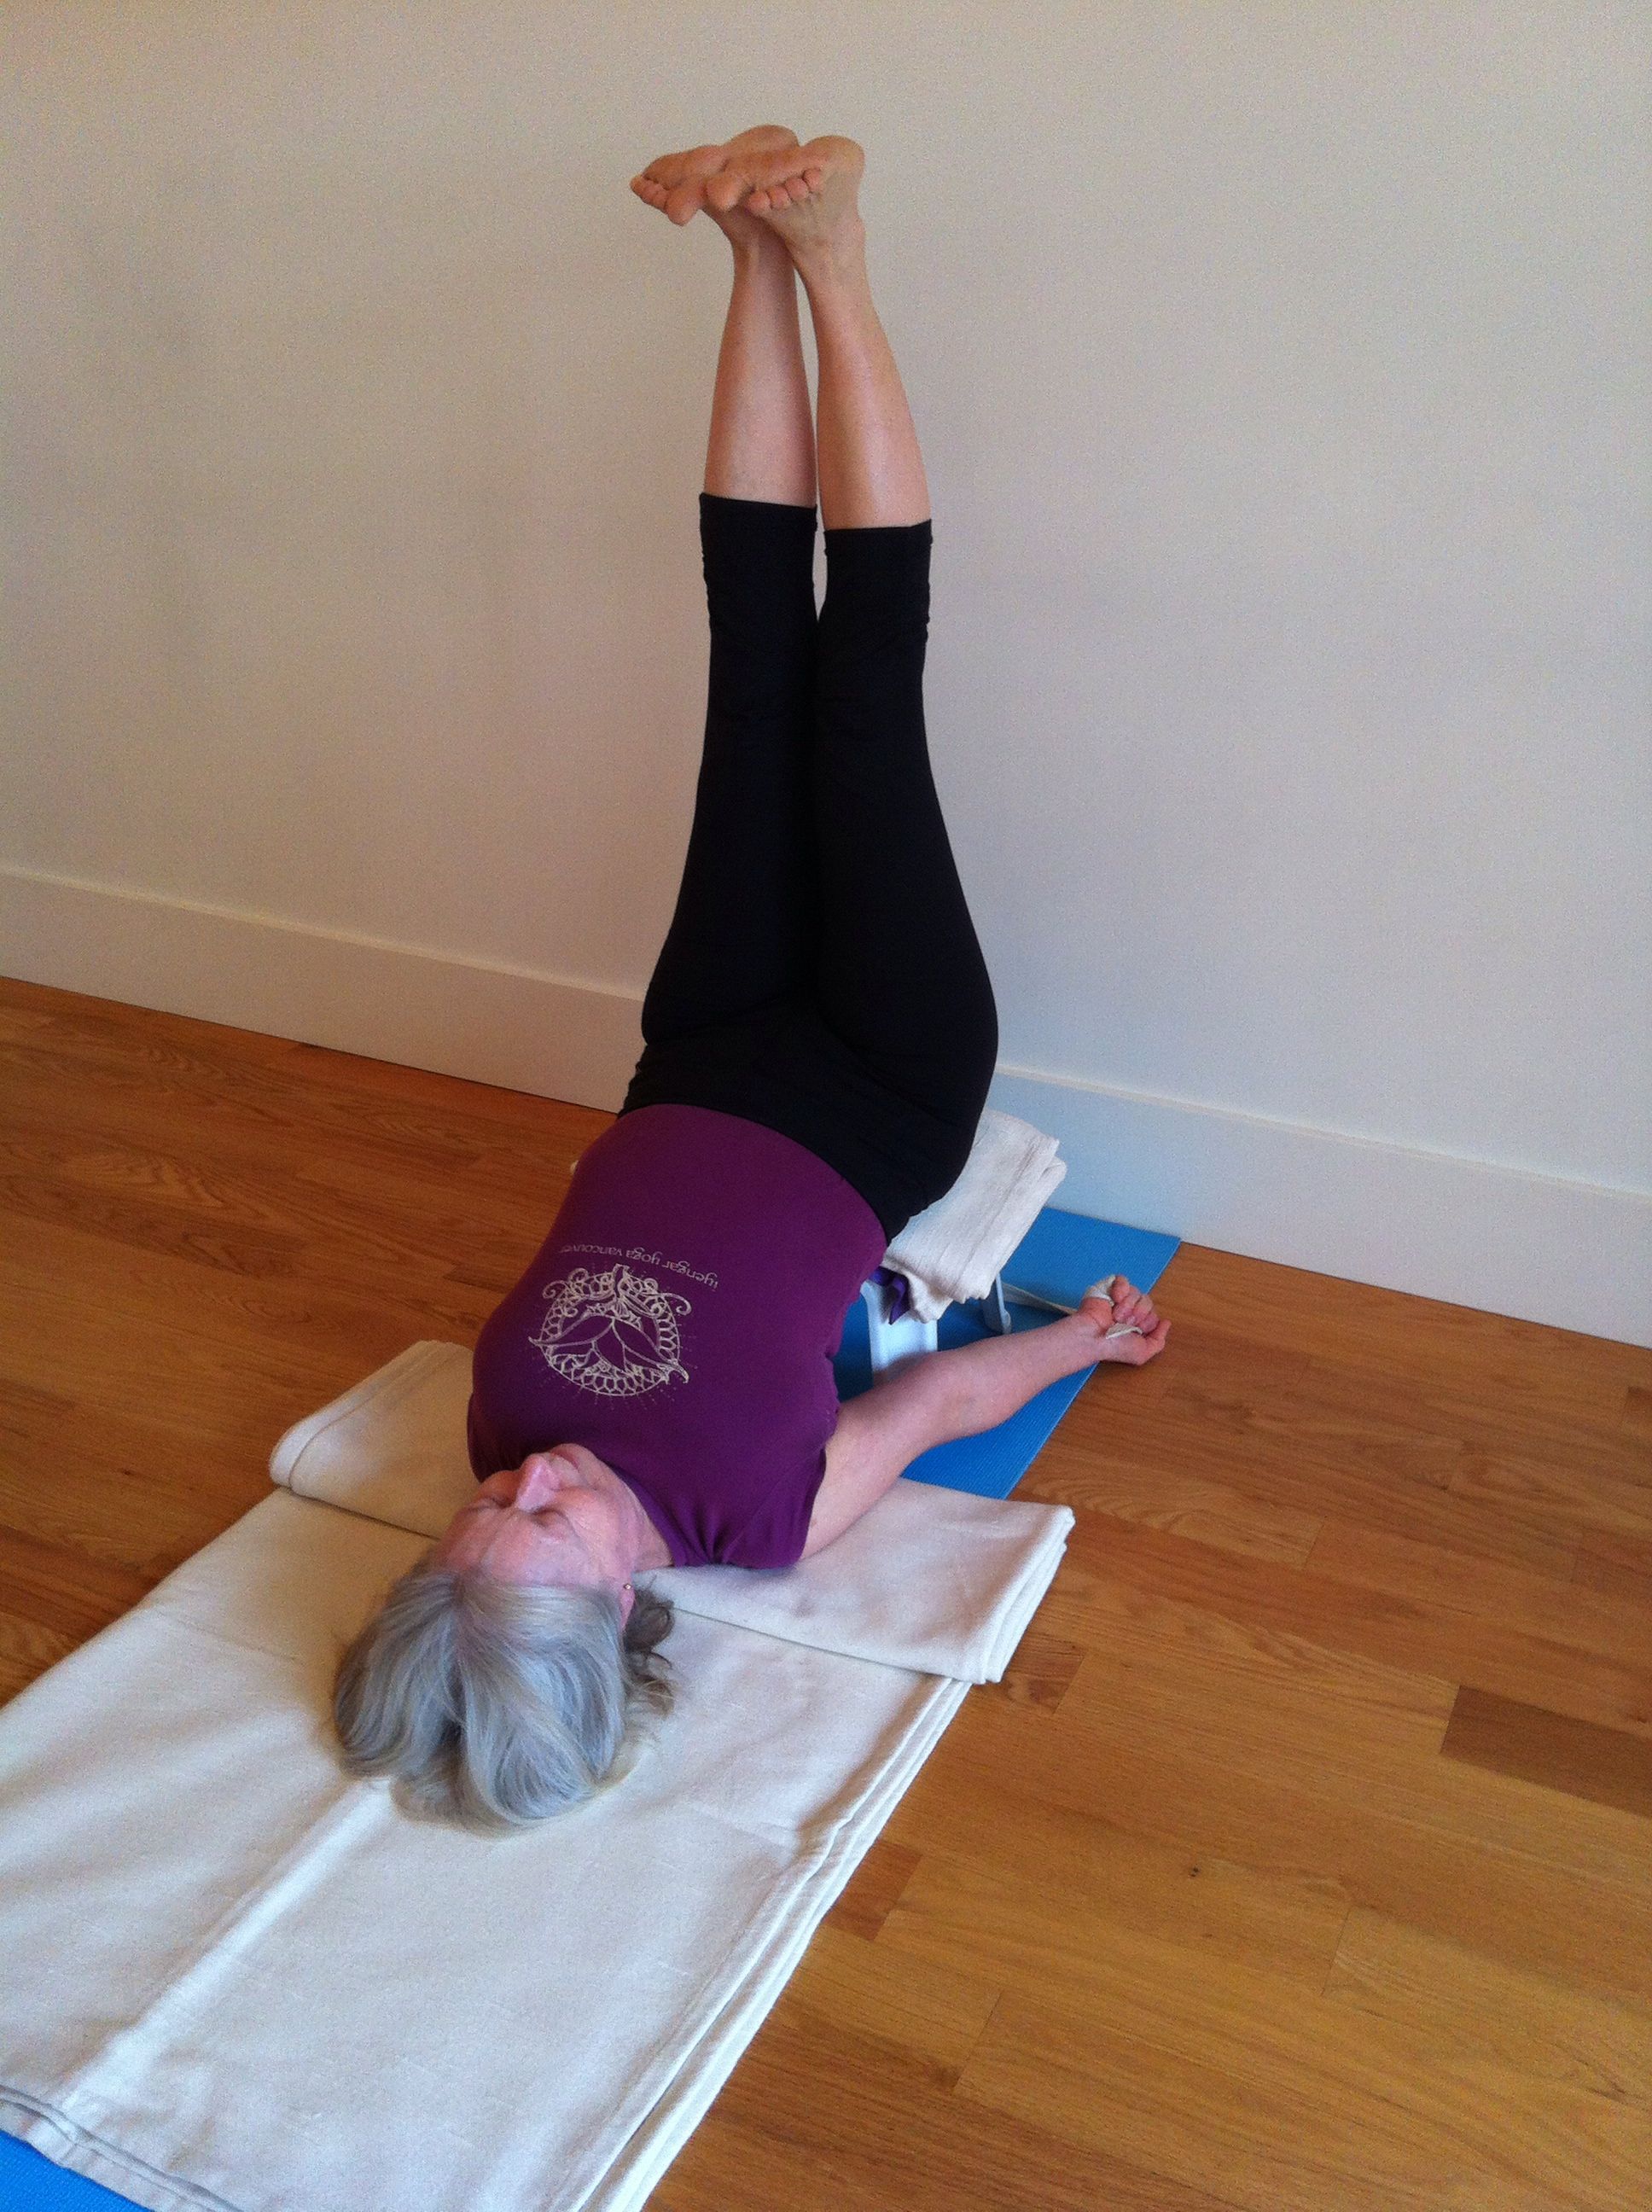
Yoga practice can sometimes be like birding. It’s only natural to want a long life list, to be eager to learn new poses, to believe that novelty trumps familiarity. The poses we know well can be like birds at the feeder, welcome, but no longer commanding rapt attention.

Jawahar from a conference in Glasgow in 2011.

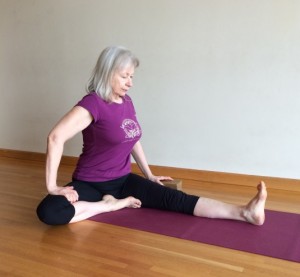
Jawahar at a conference in Glasgow in 2011.

My first day back home in Vancouver was the first day of a weekend workshop with Jawahar Bangera. Jawahar has studied with B.K.S. Iyengar since 1969. The poses were simple, and all familiar: Tadasana, Trikonasana, Parsvakonasana, Supta Padangusthasana, Paripurna and Ardha Navasana. Every pose we did was on the introductory syllabus.

And every pose was also new, including Tadasana, simple standing. Jawahar wanted stronger, straighter arms than I’m used to creating. The deltoids, at the top outer arm, were to set the arm bones into the shoulder sockets. Then the muscles, particularly in the inner arm, were to stretch to the floor.

“Tadasana is to show you how compact the body can be,” he said.

I’m as likely as anyone to adore a new pose, or a new bird. But show me new facets to an old familiar pose, and I’ll follow you anywhere.

As I’ve worked with my transformed Tadasana over the past week I’ve learned something. If you make your arms completely straight and strong in Tadasana, when you take them out sideways to move to another standing pose, you’ll feel enormous power in your arms.

I’ve also learned that the House Finches of South Carolina aren’t native birds. They’re descended from a small number of House Finches imported from the West. They were turned loose in 1940, on Long Island, New York, after failed attempts to sell them as cage birds, under the name “Hollywood finches.”

Seems there’s never an end to learning about familiar birds, or familiar poses.

Seen any good birds? Rediscovered any poses you thought you already knew? I’d love to hear about it.

If this was your kind of post, you might also like:
Release your grip by practicing Aparigraha
Forget about the Borg: Resistance is Utile

How is a yoga pose like a Russian Matrushka doll?

{ 4 comments }
janu sirsasana abdominals 2

Press strongly down into the brick on the outside of your straight leg to help lift your body, from your pubic bone to the top of your sternum.

I don’t think I’ve ever heard anyone say, “Wow, I’m really going to feel my abs tomorrow,” after taking a yoga class that concentrated on seated forward bends. And that’s a shame, because they can be great abdominal poses.

When I first started to take classes, I loved seated forward bends and practiced them at home whenever I had time. My hamstrings lengthened fairly rapidly, and eventually I could rest my head on my shin, or close to it, especially if I wasn’t too picky about not rounding my back. It was quiet and cozy inside my forward bends, and when I came back up I felt relaxed and clear.

Then my yoga life became more complex. I stopped doing seated forward bends except occasionally. After all, I “had” them, didn’t I? It seemed like a better use of my practice time to work on poses that were difficult for me: standing balances, headstands, big backbends and abdominal poses, especially the boat poses, both half and full.

A few weeks ago, while looking for clues to help understand the boat poses, I stumbled across what for me was an entirely new idea. In the section on abdominal poses in Yoga: A Gem for Women, Geeta Iyengar cautions that these poses are too intense to be attempted if the abdominal muscles and the muscles of the lumbar spine are weak. Instead, “the muscles should first be toned and strengthened,” by the practice she recommends:

• the standing poses,
• shoulder stand and several of its variations, and,
• the asanas in Section II, Plates 26 through 30.

I’ll confess that I don’t know Gem well enough to instantly match the poses to the plate numbers. I eagerly flipped to the photos only to find, to my surprise, five seated forward bends: Janu Sirsasana, Ardha Baddha Padma Paschimottanasana, Triang Mukhaikapada Paschimottanasana, Maricyasana I and Paschimottanasana.

That’s when I performed my own quintessential yogic gesture – not Namaste, but “duh!” the classic hand-to-the-forehead, Homer Simpson moment, when the light bulb turns on.

Of course, what could be more obvious? It’s much easier to strengthen your abdominals in the right way, to learn their inward, broadening and lifting action, when all you’re doing is attempting to elongate your spine while seated on the floor.

Why even try to hold the weight of your legs in full boat pose if you don’t know how to work your abdominals when they aren’t holding your legs up?

Why waste your time bailing out a leaky boat when you could back up a bit and build one that’s watertight?

Since then I’ve been working with getting and maintaining the lift of my belly in seated forward bends. It works with all of the poses Geeta recommends, of course. But I find the most clarity in Janu Sirsasana, (head-to-knee pose).

If you’d like to strengthen your abdominals in Janu Sirsasana as a Five-Minute Yoga Challenge, here are some pointers:

Let go of any idea that this is about hamstrings. Don’t even think about bringing your forehead to your shin. For the moment, think up, not forward.

janu sirsasana abdominals 1

caption = “Get the lift of your pubic bone as soon as you set your legs.

• As soon as you bring your legs into place, compact your hips. Stretch the bent-leg thigh out and down. Then focus lifting your pubic bone. You’ll know that your pubic bone is perpendicular to the floor when you feel your belly easily drawing back toward your spine, lifting and spreading, without any clenching on your part.

• As you slowly turn your spine toward your straight leg – in this case the left leg – keep the lift of your pubic bone. You’re looking for a clean feeling of lift and twisting, your belly constantly moving in and up.

• Reach your right hand to your left foot. If you can’t hold your left foot without collapsing your chest, use a strap. Then try this useful bit of propping Gabriella Giubilaro taught at a workshop some years ago: take a wood brick to the outside of your left thigh, and press your left hand into the brick. Use the leverage the brick gives you to lift your ribcage up away from your pelvis. And then stay there, breathing and lifting.

Hold for two minutes, then change sides.

For tight hamstrings, have as much height under your buttocks as you need to allow your straight leg to truly straighten, and you spine to lift.

If your bent leg knee doesn’t release toward the floor, first add more height under your pelvis, and then support your knee.

Work hard enough and long enough, and you might feel your abs tomorrow. You won’t have the sensation of having done 100 crunches — instead you’ll get something you might like even better: a new firmness, lightness and lift through your belly.

If this was your kind of post, you might also like:
Why Yoga Builds Your Inner Strength
Success! 94 Days of Shoulder Stand, and Counting
Five Good Reasons to Let a Timer Be Your Practice Buddy

{ 6 comments }
blockbaddhakonasana skeleton

Notice the thick, heavy rim at the top of the shoulder blade. It can take your weight.

Lately I’ve come to have a whole new appreciation for my shoulder blades, and in particular, for the thick part at the very top rim.
In the past, I always imagined my shoulder blades to be light and fragile, part of a gossamer shoulder girdle meant to float on top of my ribcage.

Now I feel the tops of my shoulder blades as bones with substance, strong supports for my upper back. As long as I stay connected to them, they can help me erase the effects of sitting at a desk, and of every other front-chest collapsing activity, from cooking to driving.

Even more magically, my new shoulder blade understanding has deepened my twists, enlivened my shoulder stand, and given me a new lift of my front chest in seated pranayama.

I have Mary Lou Weprin to thank for this. Mary Lou normally teaches in Berkeley, at The Yoga Room. But early in March, she travelled north to Nanaimo, B.C., for a weekend workshop.

On Friday evening, she taught a version of Baddha Konasana (bound angle pose) that involves leaning into a dense foam brick at the wall. She told us that she teaches this pose in every class, and true to her word, we worked on it every day for the three days of the workshop.

The demonstration looked disarmingly simple and relaxing. We were, after all, sitting down. But you’ll soon what makes this a worthy Five-Minute Yoga Challenge: it takes work to press the top shoulder blades into the brick and broaden them away from your spine, while simultaneously growing wider across your collar bones.

Touch your fingers to your shoulder and lift your elbow to the ceiling to make your shoulder blade move down.

Touch your fingers to your shoulder and lift your elbow to the ceiling to make your shoulder blade move down.

Try it once, and you’ll feel a new openness in your upper body. Make it a daily part of your practice, and you may be surprised by where it leads you.

blockbaddhakonasna2

Press your hands into the floor to help lift your chest.


Sit slightly away from the wall in your own version of Baddha Konasana, (bound angle pose). (Sit so that your knees are lower than your navel when your feet are pressed together. That might mean one blanket under your buttocks, or, if your hips and inner thighs are tight, a bolster propped up on two layers of chip foams.)

Place a dense foam brick at the wall, and lean back, so the top edges of your shoulder blades come to rest on the brick.

Make sure that your shoulder blades are moving away from your ears. One way to do this is to set your shoulders as you would in Savasana: bring one hand at a time to its own shoulder, with your elbow no wider than your shoulder. Then reach your elbow up to the ceiling. You should feel your shoulder blade move down and come into a cleaner contact with the brick. If you have trouble feeling the work when you try this pose, your shoulder blades are probably rounded forward, away from the brick.

Once your shoulder blades are set, lean back into the brick. It helps to press your hands into the floor to start, both to lift your side ribcage and to press back into the brick.

Broaden the tops of your shoulder blades out to the tips of your shoulders.
Then take your awareness to your front body and broaden your collarbones out to the tips of your shoulders. You should feel your front chest lifting. Check that your top buttock rolls to your mid buttock, so your lower back stays long.

blockbaddhakonasanachinlock

Let your chin move to your chest to release any tension in your neck.


You may notice that your neck feels some strain in this pose, especially after a few moments of serious effort. Try dropping your chin toward your chest. You might be surprised how close you come to the chin lock (Jalandhara Bandha) you need for seated pranayama.

You can work your legs in the pose – your inner thighs stretch toward your inner knees and your outer knees pull back toward your outer hips – but don’t lose the focus on your broadening, lifting chest.

Stay in the pose until you have a firm imprint of the brick in your upper back.
Five minutes would be a good goal. Then use your hands to bring your knees back together, and come out of the pose.

You can take this imprint with you into many other poses. All you have to do is inhabit the tops of your shoulder blades, and suddenly, as though you had a new invisible friend, there’s extra freedom in your twists, and more sensitivity and broadness in your shoulder stand – in fact in all poses in which the shoulders connect with the floor.

So lean into your shoulder blades. They can take it.

To my Nanaimo friends who were at Mary Lou’s workshop: I’d love to know what part of the work you’ve found most useful. Please comment.

If this was your kind of post, you might also like:
Crank Your Thighs in Bound Angle Pose to Protect Your Knees
Five-Minute Yoga Challenge: Stretch Your Shoulders With an Imaginary Sticky Mat
10 Yoga Poses for Shoulders, and Three Tips to Make Them Even More Powerful

{ 6 comments }
taking off and landing

Taking flight? Here's to an unhurried takeoff and a safe landing.

I spent two years of my 20s working as a flight attendant. Time long ago erased any memory of where to find the first aid kit on a Boeing 737 and which planes need the girt bar stowed so the emergency slide won’t deploy when the doors open. But every time I travel, I remember this piece of wisdom: if anything is going to go wrong, it almost always happens on taking off and landing.

Yoga poses are a bit like air travel.

Our practice asks us to live in the present and to pay attention to each moment as it unfolds. In contrast, day-to-day life urges us to identify a perfected state and move toward it as quickly as we can. No wonder beginners watch the demonstration, remember only the final shape of the pose, and return to their mats with their minds already halfway down the runway.

But if you rush, you will almost certainly push your body past its ability to hold the alignment of the pose. In a forward bend, your back will round. In a standing pose, your weight will most likely tip forward. Standing or sitting, you will probably drop your pubic bone forward, and lose your connection to your core body.

One yoga lesson that has stayed with me for 20 years came from Israeli teacher Orit Sen-Gupta. Her practice was always a delight to watch, because she moved with such intense yet relaxed concentration.

Orit taught that each pose was a continuum, that every moment, from forming the intent to do the pose, to its fullest expression, to the moment when you returned to your beginning, was an essential part of the pose. No moment was more privileged than any other; no point along the journey was any more “the pose” than any other point.

Especially as beginners, we are much more able to perform actions in the first few points along the continuum of a pose than we are when we reach the limits of our hips and hamstrings and begin to struggle with balance. And the actions we carry forward determine what we achieve in the pose.

Slow down. Resist the temptation for immediate takeoff. First become quiet; in Tadasana (mountain pose) if you’re standing, in Dandasana (stick pose) if you’re sitting. These poses are the equivalent of filling the gas tank and doing the cockpit check.

taking off and landing.warrior 3

This 'airplane pose' might be flying better if the actions of both legs had been set on takeoff.

Are your legs active? Is your pelvis aligned so the pubic bone is perpendicular to the floor? Is your chest open and lifted? Are your collarbones wide? Are your shoulder blades released away from your ears?

Keep those actions as you taxi into the pose.

In a standing pose, as soon as you step your legs wide apart, check that your pubic bone is still perpendicular to the floor, that your legs are active. Each movement offers you a choice: a smooth, mindful trip down the runway, or a bumpy ride, with your mind on what happens next.

If the danger of rushing the beginning is that you never find the full pose, collapsing out of the pose at the end is at best a break in concentration, at worst, an injury.

When you come up quickly from a deep forward bend, you are more at risk of tearing a hamstring. When you drop your shoulders as you leave headstand or elbow balance, you are more at risk of a neck or shoulder injury. When you let go of the actions before you leave a pose, you place yourself in a vulnerable position.

But there’s something more that’s sacrificed by rushed entrances and exits. Yoga asanas are containers for awareness as much as they are expressions of the body. Ideally, your connection with your Self grows inside the pose. If you rush in you may never be able to connect. If you collapse out, you lose your chance to bring a more integrated awareness out of the pose with you.

Eric the yoga teacher was blond and beautiful. He had a ponytail, a body sculpted by a strong yoga practice, and he wore half-inch plugs in his ears. I took his classes during the year I commuted to Seattle every week, and have about as many memories of his teaching as I do of technical details of airplanes.
But this piece of yoga wisdom remains: “Going into the pose is the guru; being in the pose is the guru; coming out of the pose is the guru.”
Eric would have made a good pilot.

If this was your kind of post, you might also like:
It’s not all bliss: how to work with poses you don’t like
Rooting: a yoga lesson from the garden
Withdraw your eyes, quiet your mind: Five Minute Yoga Challenge

{ 7 comments }
utkatasana: daruma doll

Ever felt like a bottom-heavy Daruma doll when you were squatting? Utkatasana can help.

I disliked Utkatasana the first time I tried it.

Wende’s demonstration made it look simple enough: raise your arms, bend your knees and sit back. Simple yes. Easy, no. I was shocked by how hard it was, and how at sea I felt. I didn’t know how to make it better. And that’s were I stayed. I never understood the actions; I just made the movements and suffered through it.

What’s worse, I didn’t really care.

In my mind, Utkatasana (pronounced OOT-kah-TAHS-anna), was a first-syllabus pose, meant for beginners. It had no glamor. What’s exotic about sitting in mid-air? It had no sweetness; none of the surrender of forward bends, the unwinding of twists or the exhilaration of backbends.

Utkatasana was just work and weakness; my own weakness brought home with exquisite clarity, with a little knee pain tossed in for good measure. Yes, I could move from standing, through Utkatasana and into a squat, but the deeper my knees bent, the heavier I felt. And once I was fully squatting, I had no idea how to stand back up again. I felt like one of those bottom-heavy Japanese Daruma dolls, except without the traditional optimism and strong determination.

Lately, though, a light has been dawning.

Malasana from the Yoga Journal

Malasana from the Yoga Journal

My learning arc started with another introductory asana, Malasana, the garland pose, out of which so many other poses grow. Turn it upside down and it’s Apanasana; place your shins on the floor and you’re in child’s pose; slide your hands under your arms and straighten your legs and you’re in Kurmasana. Whenever a pose asks you to take your front groins deep into your body, and simultaneously lengthen your spine, Malasana is there.

And what is Utkatasana except the logical route from standing to squatting, from Tadasana to Malasana and back to standing again? What was it except Malasana, all over again, only with raised arms and straighter legs?

Yes, Utkatasana has plentiful benefits. It improves flat feet. It strengthens your ankles, thighs, calves, and spine and stretches your chest and shoulders. It also stimulates your abdominal organs, diaphragm and heart.

But here’s why I’d urge you to take it on as a Five -Minute Yoga Challenge: if you focus on the actions as you practice, and work with Utkatasana consistently, it will open doors to other poses. This is, after all, part of the genius of the Iyengar method: we learn actions in simple poses, then, once we can perform them, we carry them with us to more complex poses.

Don’t imagine a grim five minutes in the pose, reenacting time spent, back to the wall, knees bent, suffering through high school gym classes. Instead, start with supine Pavana Muktasana to wake up your groins. Then stretch into child’s pose, watching your hip creases recede deeper into your body. Come to standing, then Tadasana, and then bend your knees and take Utkatasana.

If you’re just starting to work with the pose, come up and down several times. Once you feel stronger, as long as your knees are healthy, take your Utkatasana all the way into a squat, and come back up without touching your hands to the floor.

utkatasana to chair seat

Really? Still no chair seat?

Or try sitting back to a real chair. Be sure to start by standing close enough to the chair that you know it will be there for you when you sit down. Now matter how strong you are, I’ll wager that the first time you try it you’ll be asking: “where is that chair, anyway?”

Then play with it. Try, for example, shifting from Utkatasana into Warrior III. All you have to do is keep the actions, raise one leg and lower your torso – magic.

You can find excellent resources for Utkatasana on the web. Check out the asana piece at the The Yoga Journal, and Shiva Rea’s excellent YJ piece called For Beginners: Utkatasana.
For a look at how to protect your knees in the pose – essentially by keeping your weight toward your heels as much as possible, check out Dr.Eden Goldman on How Yogis Made Chair Pose Dangerous.

Here are three essential actions to establish in Tadasana:

• Roll your top back thighs away from each other.
• From the sides, plug your top thigh bones deep into your hip sockets.
• Roll your top buttock toward the floor enough to bring your pubic bone parallel to the wall in front of you. You’ll know that’s happened when you feel your abdomen lift and firm.

And four helpful actions in Utkatasana:

• Bend your knees only slightly to begin with, then sit strongly back. Focus on stretching your inner thighs toward your inner groins.

• Keep your buttocks rolling down and your pubic bone lifted.

• Keep your weight toward your heels.

• As your top thighs sink toward the floor, lift your buttock bones up.

Of all the instructions I’ve read, that last action, which I found in Shiva Rea’s article, has been the most fruitful.

First experiment with sitting back, pressing your hands down on your top thighs and lifting your sitting bones up, and repeat a few times to get the hang of it. In full Utkatasana, activate your sitting bones partway down; don’t wait until you’re at your deepest point.
If you can keep a sense of your sitting bones lifting, no matter how deeply you bend your legs, you’ll be a Daruma doll no more.

Do you have any helpful tips for Utkatasana? Please share.

If this was your kind of post, you might also like:
Use a strap around your hip crease to free your groins: Five Minute Yoga Challenge
Pain or Golden Glow: It matters what you call it
Why is yoga so hard to do?

{ 0 comments }

new question for new year

No, it's usually not this bad, but sometimes it is.

For as long as I can remember I’ve been a sucker for New Year’s resolutions. I always want to improve myself, to trade this very imperfect human being for a new and improved model.
This year, not so much.

I’m happy with my good habits of workday mornings: early rising, breath practice, 500 words on my book project (only 3,000 to go before I have a very rough, very drafty, first draft).

I plan to keep on improving the decisions I make when the choice is: water or something with caffeine in it; going to bed at 10 or staying up late; setting my timer for a pomodoro and standing up when it rings, or letting myself sit at my computer for a hazy, undetermined length of time.

I wasn’t planning any big changes. But then my resolution for 2014 found me.

I looked at my yoga space and wondered: What would happen if I put my props away after every practice?

I already know what will happen if I don’t put my props away, although the picture above, while true and unmodified as of last Friday morning, suffers from seasonal exaggeration.

The table, on its back like a disabled beetle, has a broken leg, discovered on Christmas Day, just as we were preparing for the family’s arrival. Truthfully, there is no other space in the house that’s tucked out of sight of guests, so it went into my yoga space.

new years resollution elvis radio

A closer look at Elvis, now glued back on his base.

The white box to the right of the table holds the Elvis clock radio, one of those joke family Christmas presents passed around with ritual hilarity every year. The Elvis doll had separated from his base. While we were waiting to buy the right glue for the table, it made sense to put Elvis on it. And while the wood glue was out, why not glue the tip of Ganesh’s trunk back on? The space heater, back there behind the stack of wood bricks, was there because the last time I practiced it was very cold. The jumble of straps and blankets is, sadly, pretty much a constant.

Asking what would happen if I put my props away after every practice felt startlingly new.

Here I was, at the turn of the year, not ordering myself around, but instead trying to awaken my own curiosity. It seemed like a promising approach, since the only way to answer the question would be to keep on putting the props away.

“What would happen if?” is a particularly Iyengar yoga question. We are always checking: what would happen if I extended my inner heel in this pose? What would happen if I took my upper arm bones deeper into the sockets? Would it be good? Would it be useful?

When I looked carefully, I noticed that part of my story about what would happen was one of those grand scenarios that so often accompany New Year’s resolutions.

Perhaps that one act of putting my props away would be the key to making me the flawlessly organized person I so long to be. Perhaps putting my props away is the thread I can pull, and keep pulling – not to unravel my world, but to turn it from a ball of frazzle into a neatly wound skein.

But if I became that flawlessly organized person, would I like her? And would she like me? Does she already think I’m lame?

I’m beginning to believe that not carefully asking “what would happen if?” is one reason why 90 per cent of New Year’s resolutions go down in flames every year, usually well before the end of January.
Yes, we want to change, but underneath, we’re afraid of changing too much, too soon.
It’s unlikely that putting my props away will unleash a tsunami of neatness powerful enough to turn me into someone so different that I wouldn’t know myself. Realistically, what will happen is that I’ll vacuum the floor more often, because it will be easier to do.
I suspect I will become, incrementally, just a little neater. It will be, incrementally, just a little easier to settle into practice when it’s time to start.
So I guess I’ll do it and find out.

• • • • • • • • • •

Back in November – really? it was that long ago? – I offered a copy of Sparks of Divinity in exchange for your favorite quote. It was hard to pick a winner, so hard, in fact, that I resorted to writing names on slips of paper, jumbling them up, and picking one at random. The Finger of Fate rested on Susie, who wrote: “A saying that inspires me as I go about my ordinary day:’Do small things with great love.'”
Thank you to everyone who commented.

• • • • • • • • • •

If this was your kind of post, you might also like:

Resolve to be Content: Five-Minute Yoga Practice
Pain or Golden Glow: It Matters What You Call It
How to Turn on Your Willpower and Stick to Your Yoga Practice

{ 1 comment }
little plastic stool

So lovely. All it needs is an 'I heart little plastic stools' bumper sticker.

It is unlikely that little plastic stools will ever take on the iconic status that’s afforded to chairs in Iyengar yoga. You need only look at Eyal Shifroni’s amazing new book, A Complete Guide to Iyengar Yoga Practice with a Chair, to see in how many ways the little stool would fall short. (And please, if you have any interest in yoga, do order a copy. Mine is already in the mail.)

And yet, and yet, I think we ought to at least make some bumper stickers that read: “I heart little plastic stools.”

Stools are inexpensive, widely available, small, and two take up no more space than one. They also pinch hit as useful objects in everyday life. Outside of yoga time, you can use them to get things down from high cupboards, or to reach just a little higher with the paint roller.

They give great stability in standing poses, and a chance to add more height if needed without creating a shaky tower of bricks. As I’ve already noted on this blog, you can use them to learn correct arm action in full backbend (Urdhva Dhanurasana) or to set up an accessible entry point in Reclining Hero pose (Supta Virasana).

shoulder stand preparation setup

A sticky mat on top of the stool adds protection against slipping.

And when it comes to shoulder stand, little plastic stools can be life changing.

Setting up a shoulder stand preparation on a stool is like doing a ramped-down version of chair shoulder stand. For beginners it has a huge advantage: you don’t have to lower yourself down from the chair seat, a backward leap of faith that brings a chill of fear to many of us the first few times we try it.

Yet you can still experience many of the benefits of chair shoulder stand. You’re upside down, for one thing. And you can take some weight on your shoulders, but not so much that it’s too hard to get your shoulders in place. If you also use a strap, you can also learn how to rotate your upper arms enough that you can begin to bear weight your body weight on the outer edges of your shoulders. As central as that principle is to a safe shoulder stand, it’s not easy to achieve in the full pose.

shoulder stand preparation on a stool entry

Use your hands to support you as you bring your shoulders to the floor.


Best of all, using the stool is a baby step toward shoulder stand that you can practice at home without fear. Nothing could be more useful for releasing your shoulders, changing your mental attitude, and preparing you to learn what is arguably the single most beneficial yoga pose.

What if you already do an independent shoulder stand in the middle of the room, and happily hang off the back of a chair? What does this mini version have to offer you?

You may have heard that shoulder stand teaches Jalandhara Bandha, the chin lock that you need to work safely with seated pranayama. But unless your shoulder stand is very strong, you may struggle for years before the arm action of shoulder stand is really clear in your body. The very top of your upper arm bone needs to move towards the back of your shoulder socket. That pressure down helps you lift your back ribs away from the floor. In essence it’s the same action we explored in staff pose, using the arm action to activate the muscles on the front surface of the shoulder blades.

shoulder stand preparation on a stool for Jalandara bandha

Work to bring weight to your outer shoulders and lift your ribs up and toward your chin.


The stool is especially useful here because you have you have less height under your shoulders than in a chair shoulder stand, which makes it a more accurate image of Jalandhara Bandha. And because you have less weight than in full shoulder stand, the actions are easier to do.

To do the pose:

Set up your mat with a narrow end of the mat touching the wall. Place a stool about a foot (30 cm) away from the wall, with the long end of the stool parallel to the wall. Put a small sticky pad on the stool for extra insurance against slipping, and a shoulder stand blanket, folded horizontally in two on the sticky pad, to pad your pelvis.

Open a shoulder stand blanket and place it on the mat about six inches (15 cm) away from the stool. Fold a shoulder stand blanket in half lengthwise, and place it with the smooth edge facing away from the wall.

Place a strap around the wall side of the stool, with one end accessible to each hand once you lie down.

Now sit on the stool facing the wall. Your knees will be touching the wall. Lean back and bring your hands onto the floor behind you.

Then bend your elbows and slowly bring your shoulders down onto the folded blanket. You may have to adjust the blanket. It should support your shoulders, but not your neck.

‘Take your legs up the wall, and press your heels into the wall.

If you feel uncomfortable in your neck or shoulders, come out and add another lengthwise folded blanket on top of the first, then try again.

Hold your strap and turn your palms toward the ceiling to externally  rotate your upper arms.

Hold your strap and turn your palms toward the ceiling to externally rotate your upper arms.


Once you’re settled, take your awareness to your upper arm bones. Move them deeper into the blanket. Use the leverage of your arms to help you lift your back ribs away from the floor. Your elbows will be off the blanket. Instead of trying to press your elbows down, focus on having your upper arm bones move down.

Strengthen your legs. Roll your front upper thighs inward and spread the skin on the soles of your feet away from the inner arches toward the outer arches.

Wrap your strap around each hand until it’s tight, then roll your palms toward the ceiling. You will feel your biceps rolling out and your shoulders tucking under.

Straighten your legs again, and bring them to 90 degrees, soles of the feet spreading, upper front thighs rolling in.

From the very top of your upper arm, press down into the blanket. Use that pressure to help lift your back ribs away from the floor.

Keep the front of your throat soft.

Set a timer and stay in this position for as long as five minutes. Continue to check on the softness of your face and throat, and the actions in your arms and ribcage.

shoulder stand preparation on stool baddha konasana

Enjoy the feeling of an open ribcage as you relax in Supta Baddha Konasana.


When you are ready to come out, slide backwards so your pelvis rests on the blanket that was supporting your shoulders. Place the soles of your feet together, take your knees apart, and rest in supine bound angle pose (Supta Baddha Konasana).

Photo credits: Photos in the pose by Baya Hammoudi.

If this was your kind of post, you might also like:

Ninety Days of Shoulder Stand: a Long and Winding Road
Success: 94 Days of Shoulder Stand and Counting
A 30-minute Shoulder Stand Practice to Reverse Late Afternoon Slump

{ 7 comments }

sparksofdivinity
Have you ever read words that changed your life?

Here are some that recently changed mine:

“If doubt arises in your discipline, let it come. You do your work, and let doubt go about its work. Let’s see which one gives up first.”

I still hear the same negative chatter that accompanies any move toward work that’s important to me. But now, instead of arguing, pushing it away, or letting it stop me, I recognize it as the voice of doubt, no matter what the content of the chatter.

I can greet it with friendliness, like you might greet a neurotic neighbor who drops in just when you need to be getting things done.
“Yes,” I say to the voice of doubt, “You go ahead and do your work. I’m busy with mine.”

I found these life-changing words in Sparks of Divinity: The Teachings of B.K.S. Iyengar from 1959 to 1975a collection of quotes from B.K.S. Iyengar all dating from 1959 to 1975, and reprinted in a new edition by Rodmell Press in 2012. (The title is drawn from one of the quotations: “It is through and with your body that you have to reach realization of being a spark of divinity.”)

Noëlle Perez-Christiaens,
one of B.K.S. Iyengar’s first European students,
collected the quotations from classes she took with Iyengar, from letters he wrote to her, and from quotations other Iyengar students had saved.

She published the collection in 1976, in a French and English bilingual edition, with the help of two of her students, Georgia and Philippe Leconte.

sparks of divinity 2Rodmell Press publisher Donald Moyer says that he had approached Noëlle as early as 1993 to do a new English edition. Permission finally came almost 20 years later. The new edition includes Noëlle’s diary from her first visit to India in 1959, and selected excerpts from Iyengar: Un Hindou Mystique Ivre de Dieu (Iyengar: a Hindu Mystic Drunk on God) the biography of Iyengar that she published in 1976.

There are also photos of a young Iyengar and his family, and a dozen stunning photos of Noëlle and Iyengar in asana practice. If you’ve ever wondered about the mysterious woman in the striped bikini in plate 162 in Light On Yogawonder no more. That’s Noëlle.

Light on Yoga is full of pictures of this vintage, but there, he’s posing, presenting a technically perfect image of the asana. In these pictures he’s fully involved, helping his student, or performing the pose with her.

Best of all, thanks to Donald’s careful editing, the quotations are now crisp and lively, no longer littered with typos and mistranslated words. The result is what Donald calls “vintage Iyengar, at his most creative and his most open.”

“With Sparks, you are nearer to the source,” he says. “These insights would be dropped in the middle of a class or come out of a specific situation. He is great at these piercing epigrams.”

Anyone who studies Iyengar yoga knows that the work is always changing and growing – not in its principles, but in their application.

“Just as a painter progresses, a teacher has to progress too,” Donald says. “A teacher is compelled into new exploration to keep freshness in his work, but that doesn’t negate his older teachings. I think there’s value in going back. Picasso’s blue period, even though it came early, is just as masterful as his later work.”

The quotations also show the relationship that Iyengar had with Noëlle, how he treated her as a colleague and a friend.

In Sparks of Divinity, he’s vulnerable; sometimes he’s a teacher with no students showing up. It’s from the time when he was just Mr. Iyengar, and not Guruji,” Donald says.

“That’s what he was when I first met him, and that’s the Iyengar that is still most real to me.”

Donald’s favorite Iyengar quote from the book?
“Your bodies are in the past; your minds in the future. When you do yoga they come together in the present.”

Do you have words you live by? Is there a quotation, from yoga or anywhere else, that changed your life for the better? Tell us what it was, in the comments on this page or on Facebook, and you’ll be entered in a draw for a copy of Sparks of Divinity, courtesy of Rodmell Press.

If this was your kind of post you might also like:

Happy Birthday to the Man Who Changed My Life
How to Turn on Your Willpower and Stick to Your Yoga Practice
Where Do You Find Your Inner Teacher?

{ 8 comments }

For some time now I have suspected that there might in fact be two kinds of people in the world: those who have a natural connection to their core, and those like me, the tap-dancing star on the left, who don’t. I dug that picture out just to confirm that yes, even when I was four, the pattern of a rounded upper back and saggy belly had already found a home in my body.

From the first time a gym teacher had us lie on our backs and slowly lower our legs, I’ve known that my abdominals were shockingly weak. Asana practice has made me much stronger. But if I had to pick a weakest spot, my core would be neck-and-neck for first place with my triceps.

Thing is, triceps aren’t particularly complicated. Abdominal muscles are a different story. In some poses, the actions were clear enough. But in others – Warrior III for example – I knew I was collapsing in my core, but I didn’t know what to do about it.

For the first time ever, I’m beginning to think that might change.

Recently I had what I think of as “the sides of the navel” revelation.

All the poses I’ve been most interested in lately – garland pose (Malasana), boat pose (Navasana), joint-freeing pose (Pavana Muktasana) and ear-pressure pose (Karnapidasana) – have one important thing in common.
They ask for a way of connecting to the abdominal muscles that I’ve never really understood before. And if you don’t connect, it’s hard to strengthen your abdominals.

The sides of the navel:
If you haven’t heard before that your navel has sides, here’s a way to imagine it: think of a line drawn on your skin about an inch away from each side of your navel.
The line has its starting point about two inches below your navel, and it ends about two inches above.
The line, of course, is energetic, not anatomical. It’s a lively, flexible line, capable of moving in two directions: from its lowest point, two inches below your navel, it gently scoops down from the surface of the skin, toward your spine, then lengthens along your spine, up toward your diaphragm.

You can get a sense of it if you set yourself up for pranayama practice with folded blankets supporting the back of your ribcage, but not your lumbar spine – a position in which you can feel the separation of your chest and abdominal cavities.

In this position, you can observe your inhalations, watching the sides of the navel flow inward, toward the spine, and up toward the diaphragm.

In a recent class, Louie linked this inhalation to boat pose, which also requires the sides of the navel to lengthen and moving toward the spine.

strenghten abdominals 1

In a neutral position, feel the sides of your navel drawing in and up.

I was mulling it over a few days later when a light bulb appeared over my head.

I had been focusing on the inhalation – but what about the exhalation?

I found that if I spread the skin of my back body on the exhalation, then the sides of my navel dropped even deeper, and my abdominal muscles spread sideways. If I repeated those actions over several breath cycles, I could feel my back body starting to wrap around, as though it was supporting and strengthening my core.

The Five-Minute Yoga Challenge:

strengthen your abdominals.2

Continue to keep the sides of your navel moving to your spine and lengthening as you draw your knees in.

This Five-Minute Yoga Challenge asks you to use the same breath pattern in a pose that’s much more accessible than boat pose: you lie on your back and draw both knees in toward your chest.

It’s called Supta Pavana Muktasana (supine joint freeing pose) in Lois Steinberg’s Geeta S. Iyengar’s Guide to a Woman’s Yoga Practice, an essential book for any yoga library.

Lie down on your back in constructive rest position, knees bent, heels wider than your toes. Draw your shoulders under and lengthen your lower back.

With your inhalations, lengthen the sides of your navel, both down toward your spine, and up toward your diaphragm. With every exhalation, watch your back body spread on the floor.

Relax and let the rhythm become familiar.

Once you’re comfortable with the movement of your breath, lift your feet away from the floor and bring your knees a little closer to your chest. Be slow.

strengthen your abdominals.3

Keep your breathing soft, your neck and shoulders free from strain as you round up toward your knees.

Over the course of several breath cycles, bring your knees closer, keeping the same breath pattern. No clenching, no strain, just consistent quiet focus on your breath.
Bring your arms around your knees. (You can hold at the back of your knees if compressing your knees is painful.)
Pay attention to the feeling of your back body wrapping around towards your legs and drawing them closer.
Keeping your neck and shoulders quiet, bring your forehead to touch your knees. Stay there and breathe for several cycles, then relax, and repeat.

When you’re done, stretch out in supine mountain pose (Supta Tadasana) to release any tension in your belly.
Stretch your heels away to lengthen your buttocks. Take your arms overhead, palms facing the ceiling, and stretch your back body towards your fingertips.

Work with this at least every second day for a week or two, and you may find a new connection into your core body, something that gives you more strength in a wide range of poses, including, yes, Warrior III.

owards your fingertips. Work with this at least every second day for a week or two, and you may find a new connection into your core body, something that gives you more strength in a wide range of poses, including, yes, Warrior III.

Asana photo credit: Baya Hammoudi

If this was your kind of post you might also like:
Find Your Bungee Cord: Five-Minute Yoga Challenge
Squeeze a Brick for Strength and Clarity in Your Legs: Five-Minute Yoga Challenge
Twist in a Chair to Free Your Back: Five-Minute Yoga Challenge

{ 11 comments }

The value of knowing what you don’t know

knowing what you don't know

Don't drop that question mark. It might be your most valuable yoga prop.

Last night after class, I asked a student how her home practice was going.

A few weeks earlier, we’d met privately to work out a routine that was specific to her: something short and simple that would address the tight shoulders, hips and hamstrings that were restricting her in the poses.

It turned out she wasn’t all that happy.
I’d suggested rolling on massage balls as the most direct and pleasant route to releasing the tension in her shoulders. They were working just fine.

But something wasn’t right with the standing poses. “I wish they felt more natural,” she said. “I feel like I don’t know what I’m doing. I keep wondering – am I supposed to move my hips in Triangle pose in this way?”
At which she gave her pelvis an exaggerated, exasperated swing to the left.

I understood her frustration, but I couldn’t have been more pleased.

This student had made a transition. Alone, at home, grappling with the subtle mysteries of Triangle pose, she had discovered, in detail, something she didn’t know.

In the language of the four stages of competence theory, she had moved from unconscious incompetence to conscious incompetence.

That may not sound like much, but it’s one of the most important signs that someone is on the path to a personal yoga practice and not just wandering the woods.

To ask a question of a pose when you’re alone with it might in fact be the essence of a personal practice.

Yes it’s a long trip from frustration over not knowing how the hips move in a standing pose to arriving at the destination: a laser focus in every pose. But those two states share a genuine awareness that you don’t know it all, and there’s something in particular you’d like to know.

As stages go, conscious incompetence is scratchy, especially at the beginning. When you first turn inward and pay attention, you mostly run up against your limitations. Then, provided you stick with the practice, the poses open up and it feels much better.

With this learning model, no matter how discouraging it is to be consciously incompetent, you always have the third stage, conscious competence, to look forward to.

At this stage you can do at least some of the poses, albeit with effort, and you know a lot about them. It would be the same as having learned to drive a car well enough that you can negotiate city traffic, but you have to use all of your attention to do it.

The fourth stage, unconscious competence, is often compared to the moment when driving has become so automatic that you can drive and carry on a conversation, or listen to a radio at the same time.

I’m not sure this translates all that well into asana practice. No matter how competent we may be, we don’t do an asana in the background of our awareness while turning the focus away from the body and the pose.

Here’s one of B.K.S. Iyengar’s descriptions of what a fourth stage of asana practice might be like:

“While doing the postures your mind should be in half-consciousness, which does not mean sleep. It means silence, emptiness, space, which can then be filled with an acute awareness of the sensations given by the posture. You watch yourself from inside. It is a full silence.”

I found that in my lovely new edition of Sparks of Divinity: The Teachings of B.K.S. Iyengar from 1959 to 1975 by B.K.S. Iyengar (April 24 2012).

It’s a collection of quotations assembled by one of his first European students, Noelle Perez-Christiaens.

I’ve been reading it lately, and I am now full of epigrams. Here’s one I find particularly encouraging:

“You must be as joyful when you fail again and again as you are joyful when you succeed. It is often when you fail that you move toward the goal without being aware of it.”

Makes me want to walk into my uncertainty and practice there.

{ 1 comment }